Adding Google Analytics to your WordPress site is one of the best ways to understand your audience and improve your site’s performance. Google Analytics gives you valuable insights into your visitors’ behavior, preferences, and demographics, helping you make informed decisions.
Here’s a straightforward guide on how to set up Google Analytics in WordPress, whether you’re a beginner or an experienced user.
Table of Contents
ToggleWhy Use Google Analytics?
Google Analytics helps you:
- Understand User Behavior: Learn which pages your visitors engage with the most.
- Track Key Metrics: Keep tabs on important data like bounce rate, page views, and average session duration.
- Improve Marketing Efforts: Get insights into your top traffic sources and audience demographics.
Methods to Add Google Analytics to WordPress
There are several ways to add Google Analytics to WordPress, ranging from using a plugin to adding code manually. Let’s go through each method.
Method 1: Adding Google Analytics Using a Plugin
Using a plugin is the easiest and most popular method, especially if you’re not comfortable with coding.
Step 1: Create a Google Analytics Account
- Go to the Google Analytics website.
- Sign in with your Google account or create one if you don’t have it.
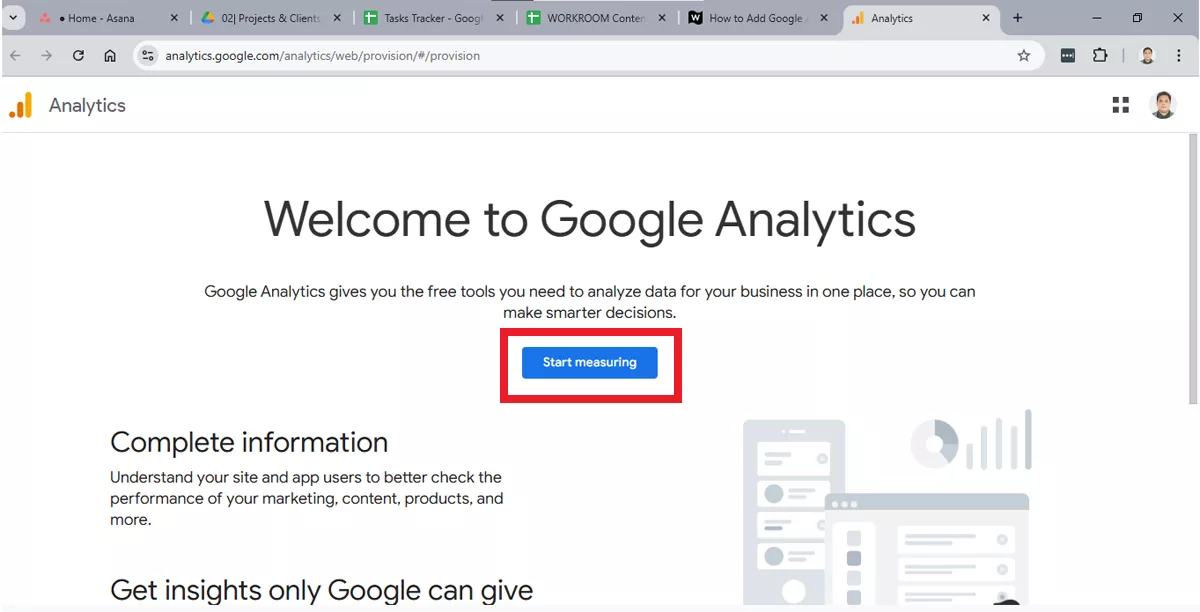
- Click on Start Measuring and enter your account details (e.g., account name, property name, time zone).

Step 2: Install and Activate a Google Analytics Plugin
- Go to your WordPress Dashboard.
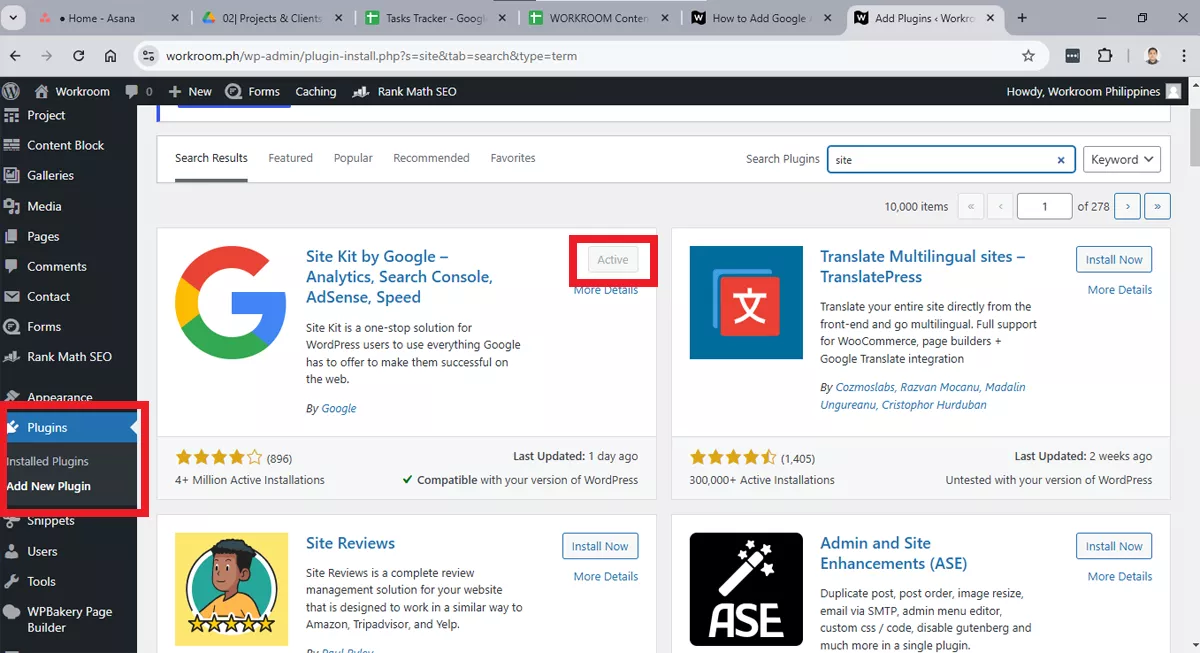
- Click on Plugins > Add New.
- Search for MonsterInsights or Site Kit by Google (both are popular options).
- Click on Install Now and then Activate.

Step 3: Connect Google Analytics to the Plugin
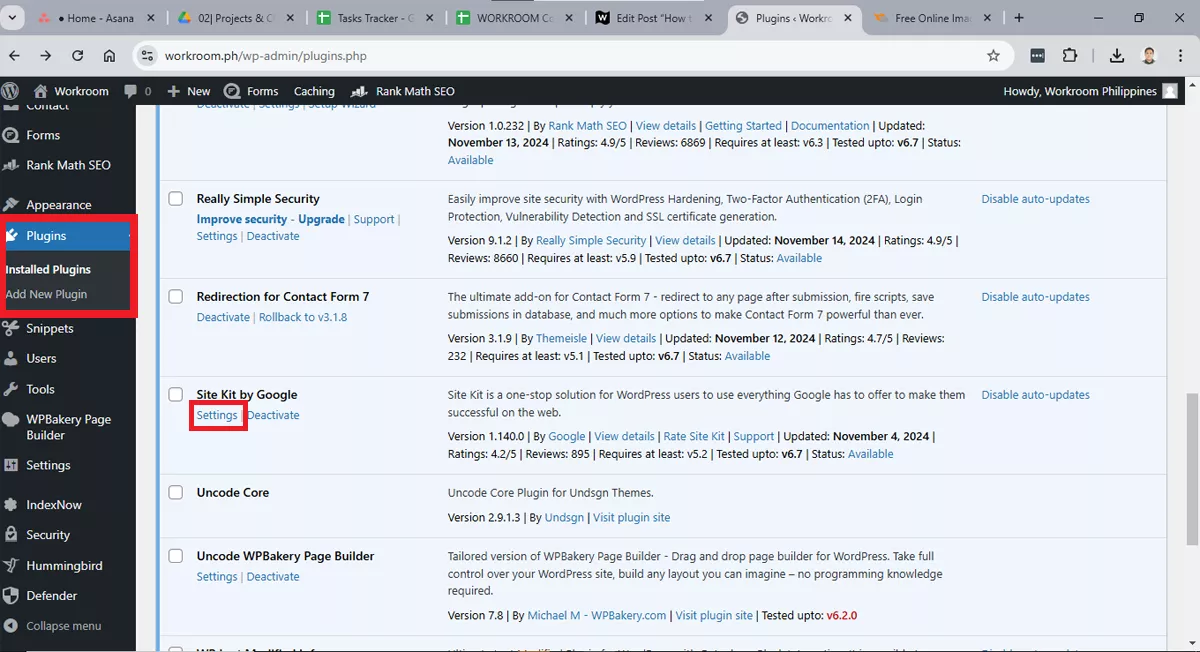
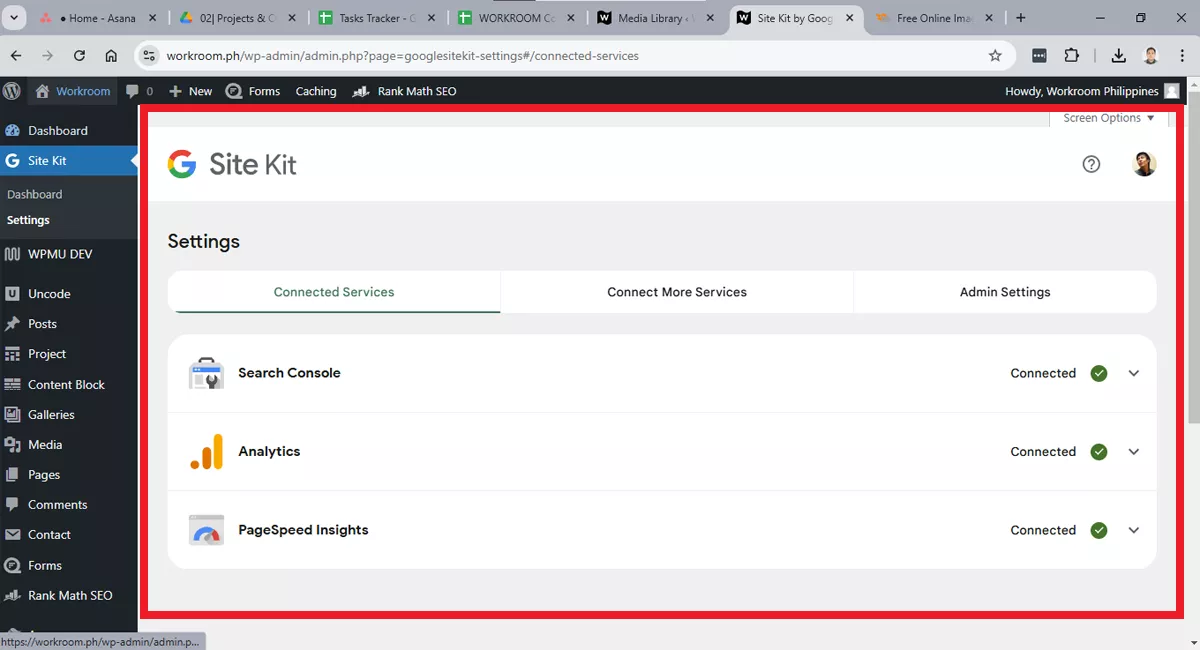
1. Go to Insights > Settings (for MonsterInsights) or Site Kit > Settings (for Site Kit by Google).

2. Follow the instructions to connect your Google Analytics account.
3. Grant permissions as prompted to complete the setup.

With these plugins, you’ll have access to Google Analytics data directly in your WordPress dashboard, making it easy to monitor your site’s performance.
Method 2: Manually Adding Google Analytics Tracking Code
If you prefer a lightweight solution without plugins, you can add the Google Analytics tracking code manually.
Step 1: Get Your Google Analytics Tracking ID
- Log in to your Google Analytics account.
- Go to Admin in the left sidebar.
- Select the property for your site and click on Data Streams.
- Click on Web and select your website.
- Copy the Measurement ID (starts with “G-”) to use in WordPress.
Step 2: Add the Tracking Code to Your WordPress Theme
- In your WordPress Dashboard, go to Appearance > Theme File Editor.
- Find the header.php file in your theme (be careful not to edit core files if you’re unsure about coding).
- Paste the tracking code immediately before the closing </head> tag.
- Click Update File to save changes.
Important Note
When manually adding code, if you change or update your theme, the tracking code might be removed. Consider using a child theme or add the code through a code management plugin like Insert Headers and Footers to avoid this issue.
Method 3: Using Google Tag Manager
For more advanced tracking, Google Tag Manager (GTM) offers a way to add Google Analytics and other tags without altering code each time.
Step 1: Set Up Google Tag Manager
- Go to Google Tag Manager.
- Sign up with your Google account and create a new container for your site.
- Copy the GTM code snippets as instructed.
Step 2: Add GTM Code to Your WordPress Site
- In your WordPress dashboard, go to Appearance > Theme File Editor.
- Add the first code snippet in the <head> section and the second snippet immediately after the opening <body> tag in your header.php file.
- Save your changes.
Step 3: Set Up Google Analytics in GTM
- Go to your Google Tag Manager account and click Add a New Tag.
- Name your tag “Google Analytics” and select Google Analytics: GA4 Configuration.
- Paste in your Measurement ID.
- Set All Pages as the trigger and save the tag.
Using Google Tag Manager makes it easier to manage multiple tracking codes, but it may be more complex than simply using a plugin or directly adding the tracking code.
Conclusion
Adding Google Analytics to your WordPress site is an essential step in optimizing your website’s performance. Whether you choose a plugin, add the code manually, or use Google Tag Manager, each method allows you to gather valuable insights into your audience’s behavior. Now you’re equipped to track your WordPress site’s performance and make data-driven decisions!
Adding Google Analytics is essential for understanding your audience, but a well-designed site is just as crucial for keeping visitors engaged. At Workroom, we offer professional WordPress web design services for agencies and businesses, creating visually appealing, user-friendly sites that work seamlessly with tools like Google Analytics to help you make data-driven improvements.
Roel Manarang is a seasoned digital marketer and designer with over a decade of experience helping businesses achieve online success. As the Director of Operations at Workroom, he combines his passions for design and marketing to deliver exceptional results for his clients. With a proven track record of delivering exceptional results for more than 100 businesses, Roel is a sought-after creative strategist specializing in world-class content, websites, SEO, and social media campaigns. Find him on Instagram, LinkedIn, and YouTube.
Subscribe And Receive Free Digital Marketing Tips To Grow Your Business
Join over 8,000+ people who receive free tips on digital marketing. Unsubscribe anytime.


